How to use Amundsen with Amazon Neptune
An alternative to Neo4j as Amundsen’s database is Amazon Neptune.
This tutorial will go into setting up Amundsen to integrate with Neptune. If you want to find out how to set up a Neptune instance you can find that information at Neptune Setup.
Configuring your Databuilder jobs to use Neptune
The Neptune integration follows the same pattern as the rest of Amundsen’s databuilder library.
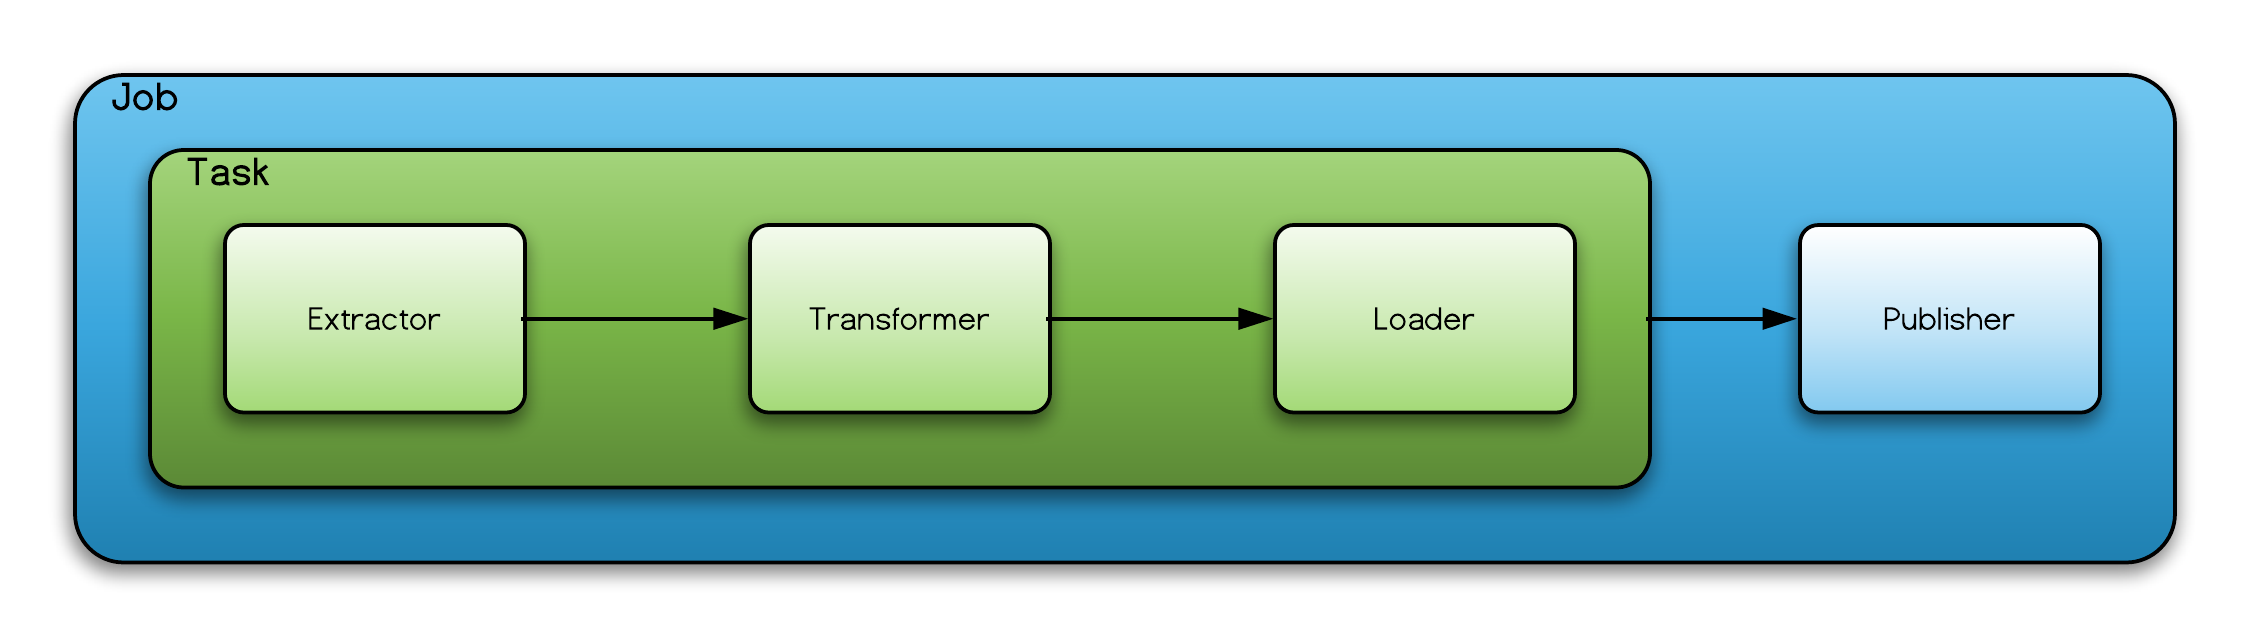
Each job contains a task and a publisher and each task comprises of a extractor, transformer, and loader.
The Neptune databuilder integration was built so that it was compatible with all extractors (and the models produced by those extractors) so that only the loader and publisher diverge from the Neo4j integration.
Note: Even though the Databuilder may support the model the Metadata Service might not.
Loading data into Neptune
The sample_data_loader_neptune.py script contains an example on how to ingest data into Neptune. However, the main components are the FSNeptuneCSVLoader and the NeptuneCSVPublisher
The FSNeptuneCSVLoader is responsible for converting the GraphNode
and GraphRelationship
into a csv format that the Neptune bulk loader expects. The FSNeptuneCSVLoader has 5 configuration keys
NODE_DIR_PATH- Where the node csv files should goRELATION_DIR_PATH- Where the relationship csv files should goFORCE_CREATE_DIR- Should the loader overwrite any existing files (Default is False)SHOULD_DELETE_CREATED_DIR- Should the loader delete the files once the job is over (Default is True)JOB_PUBLISHER_TAG- A tag that all models published by this job share. (should be unique)
NeptuneCSVPublisher takes the csv files produced by the FSNeptuneCSVLoader and ingest them into
Neptune. It achieves this by using the Neptune’s bulk loader API.
The flow of the NeptuneCSVPublisher is:
- Upload the csv files to S3
- Initiating a bulk loading request
- Poll on that status of the request till it reports a success or failure
The NeptuneCSVPublisher has the following configuration keys:
NODE_FILES_DIR- Where the publisher will look for node filesRELATION_FILES_DIR- Where the publisher will look for relationship filesAWS_S3_BUCKET_NAME- The name of the S3 bucket where the publisher will upload the files to.AWS_BASE_S3_DATA_PATH- The location within the bucket where the publisher will upload the filesNEPTUNE_HOST- The Neptune host in the format of<HOST>:<PORT>no protocol includedAWS_REGION- The AWS region where the Neptune instance is located.AWS_ACCESS_KEY- AWS access key (Optional)AWS_SECRET_ACCESS_KEY- AWS access secret access key (Optional)AWS_SESSION_TOKEN- AWS session token if you are using temporary credentials (Optional)AWS_IAM_ROLE_NAME- IAM ROLE NAME used for the bulk loadingAWS_STS_ENDPOINT_URL- AWS STS endpoint url, if not set the global endpoint will be used (Optional)FAIL_ON_ERROR- If set to True an exception will be raised on failure (default False)STATUS_POLLING_PERIOD- Period in seconds checking on the status of the bulk loading request
Publishing data from Neptune to Amundsen Search
In order to have your entities searchable on the front end you need to extract the data from Neptune and push it
into your elasticsearch cluster, so the search service can query it. To achieve this, the data builder comes with the
NeptuneSearchDataExtractor
which can be integrated with the FSElasticsearchJSONLoader
and the ElasticsearchPublisher.
An example job can be found in the sample_data_loader_neptune.py
in the create_es_publisher_sample_job function.
The NeptuneSearchDataExtractor supports extracting table, user, and dashboard models in a format that
FSElasticsearchJSONLoader accepts. It has the following configuration keys:
ENTITY_TYPE_CONFIG_KEY- Type of model being extracted. This supports table, user, dashboard (defaults to table)MODEL_CLASS_CONFIG_KEY- Python path of class to cast the extracted data to. (Optional)JOB_PUBLISH_TAG_CONFIG_KEY- Allows you to filter your extraction to a job tag. (Optional)QUERY_FUNCTION_CONFIG_KEY- Allows you to pass in a extraction query of your own (Optional)QUERY_FUNCTION_KWARGS_CONFIG_KEY- Keyword arguments for the customQUERY_FUNCTION(Optional)
The NeptuneSearchDataExtractor uses the
NeptuneSessionClient
to extract data from Neptune.
The NeptuneSessionClient supports the following configuration keys:
NEPTUNE_HOST_NAME- The Neptune host in the format of<HOST>:<PORT>no protocol includedAWS_REGION- The AWS region where the Neptune instance is located.AWS_ACCESS_KEY- AWS access key (Optional)AWS_SECRET_ACCESS_KEY- AWS access secret access key (Optional)AWS_SESSION_TOKEN- AWS session token if you are using temporary credentials (Optional)
Removing stale data from Neptune
Metadata often changes, so the neptune_staleness_removal_task is used to remove old nodes and relationships. The databuilder contains an example script using the neptune_staleness_removal_task.
Configuring the Metadata Service to use Neptune
To set up Neptune for the Metadata Service you can copy the
NeptuneConfig and
point the environment variable METADATA_SVC_CONFIG_MODULE_CLASS to it. For example:
export METADATA_SVC_CONFIG_MODULE_CLASS=metadata_service.config.NeptuneConfig
The NeptuneConfig requires a few environment variables to be set these are:
PROXY_HOST- The host name of the Neptune instance. Formatted like:wss://<NEPTUNE_URL>:<NEPTUNE_PORT>/gremlinAWS_REGION- The AWS region where the Neptune instance is located.S3_BUCKET_NAME- The location where the proxy can upload S3 files for bulk uploader
In addition to the Config parameters above:
IGNORE_NEPTUNE_SHARDenvironment variable must be set to ‘True’ if you are using the default databuilder integration.STS_ENDPOINTcan also be set if the default endpoint does not work for your environment. For example:https://sts.ap-southeast-1.amazonaws.com. Refer to AWS Documentation for a full list of STS endpoints.